After implementing the animation state machine and per-state behaviour scripts, the next step is defining a clear workflow for building enemies on top of this system.
This post explains the intended pattern for implementing enemy behaviour so that all gameplay code follows the same structure.
Overview
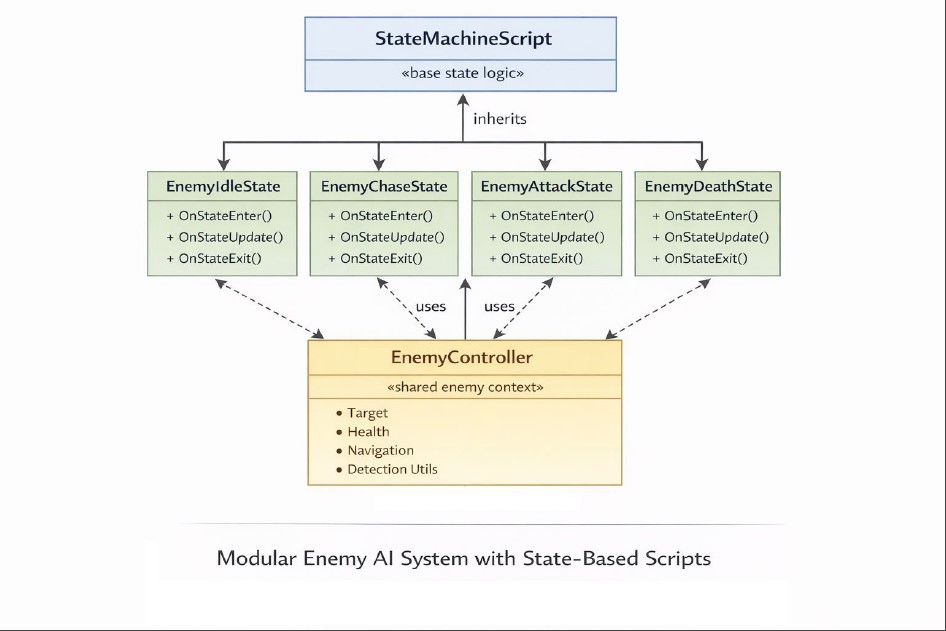
Enemy behaviour is built using three main pieces:
- StateMachineScript (per state)
- EnemyController (shared logic)
- Animation State Machine (transitions & flow)
Each one has a clear responsibility:
- State scripts → decide what happens in a specific state
- Controller → stores data and exposes reusable logic
- State machine → drives execution and transitions
The core idea
Instead of writing one large AI script, behaviour is distributed per state.
Each state:
- runs its own logic
- queries shared data from the controller
- triggers transitions when needed
The animation system:
- decides which state is active
- calls the corresponding state script
Step 1 — Create the EnemyController
The controller is the shared context for all states.
It should contain:
- target handling (player reference)
- distance checks (detection / attack / lose range)
- movement (navigation / chasing)
- health and death logic
- reusable helpers
Example responsibilities:
bool HasTarget();
float GetDistanceToTarget();
bool IsTargetInAttackRange();
bool MoveTowardsTarget();
void ApplyDamage(float damage);
bool IsDead();
bool TrySendDeathTrigger();
Important rule
The controller should not decide states. It only provides data and utilities.
Step 2 — Create State Scripts
Each state is a separate class inheriting from StateMachineScript.
Example:
- EnemyIdleState
- EnemyChaseState
- EnemyAttackState
- EnemyDeathState
Each state implements:
OnStateEnter()OnStateUpdate()OnStateExit()Step 3 — Access the controller from states
Each state should retrieve the controller:
EnemyController* controller = getController();if (!controller) return;This gives access to all shared logic.
Step 4 — Handle death first (always)
Every state should begin with:
if (controller->TrySendDeathTrigger()){ return;}Why?
- death is a global interrupt
- it must work from any state
- avoids duplicating transitions everywhere
Step 5 — Write state-specific logic
Each state should be focused and simple.
Example: Idle
if (controller->IsTargetDetected()){ AnimationAPI::sendTrigger(anim, "Chase");}Example: Chase
controller->MoveTowardsTarget();if (controller->IsTargetInAttackRange()){ AnimationAPI::sendTrigger(anim, "Attack");}else if (controller->IsTargetLost()){ AnimationAPI::sendTrigger(anim, "Idle");}Example: Attack
if (!controller->IsTargetInAttackRange()){ AnimationAPI::sendTrigger(anim, "Chase");}Step 6 — Define transitions in the graph
The state machine graph defines:
- states
- transitions
- triggers
Example:
| From | To | Trigger |
| Idle | Chase | “Chase” |
| Chase | Attack | “Attack” |
| Attack | Chase | “Chase” |
| Any | Death | “Die” |
Important rule
States should not force transitions manually. They should only send triggers.
Step 7 — Handle death properly
Death flow:
- ApplyDamage() reduces health
- If health ≤ 0 → Kill()
- States call TrySendDeathTrigger()
- State machine transitions to DEATH
- EnemyDeathState:
- plays animation
- destroys object after delay
Final architecture
[ EnemyController ]
        ↑
        │ (shared data & logic)
        │
[ StateMachineScript ]
        ↑
        ├── IdleState
        ├── ChaseState
        ├── AttackState
        └── DeathState
    (Animation State Machine controls execution)
Key guidelines
1. Keep states simple
States should:
- read data
- make decisions
- trigger transitions
Not:
- store complex data
- duplicate logic
2. Use the controller for everything shared
If multiple states need it → it belongs in the controller.
3. Always use triggers
Do not force states manually unless debugging.
4. Death is global
Always check death first.
5. Think in states, not conditions
Don’t write:
if (a && b && c && d)Instead:
- split logic into states
- let transitions handle flow
Why this pattern works
- modular → each state is independent
- scalable → easy to add new states
- readable → no giant AI script
- aligned with animation → behaviour follows state machine
Closing
This system is the foundation for all enemies in the gameplay phase.
Following this pattern ensures that:
- behaviour stays consistent across the team
- state machines remain the source of truth
- logic remains clean and maintainable